Bringing bricked Xiaomi STYJ02YM back to life
So you just received your brand-new Xiaomi vacuum. Full of enthusiasm you've taken it out of the box, found a place for it to charge, connected to power and paired with the Mi Home app. There's a chance that the first thing you've seen was a message prompting you to update the device to a newer firmware version. And you went for, of course. Maybe you were affected by the "stuck on 80% bug" and had to use my workaround to make it download the update, maybe you were one of the lucky ones and didn't have to tinker for it to start. Nevertheless, the update is now downloading. You wait impatiently, eager to see how the Chinese device cleans the floor in your apartment. 90% complete, just a few more seconds and the newest firmware is going to be there. 95%, the device restarts. LED lights on the buttons start slowly blinking white. You wait for it to finish booting up and…
Yeah, that's it. Nothing's happening. After a few more minutes of waiting, the progress bar in the app turns red and says that the update has failed. The vacuum's light doesn't turn solid white and keeps slowly flashing instead. You try to use different key combinations, maybe even make the lights go orange or red. The device, however, is completely dead. A soft Chinese voice doesn't greet you nicely when you power on the vacuum. You're sad, mad, broken and wondering why you didn't buy a Roomba.
I, too, have been there. After hours of browsing the Internets, searching for a way to fix it, I started to believe that my adventure with the STYJ02YM has ended even before it began. The vacuum didn't even start the ADB server on boot anymore. There was no way to connect to it through the micro USB port. So, having nothing to lose, I took it apart. And many hours later, I heard the Chinese voice, and the device started breathing again. And now I'm writing this little guide to tell you how I did it.
A few words before you begin
While I realize that if you're reading this guide, you probably don't have anything to lose too, you need to realize that this is a dangerous operation and if something goes wrong, your device might end up in a state that nothing will ever be able to fix it. This is not a guide for people who have no experience with electronics. As always, I take no responsibility for any damage done to your device.
Prerequisites
These are the things you're going to need if you want to follow the guide:
- A bricked Xiaomi STYJ02YM
- Micro USB cable
- USB to TTL converter (I used this one)
- Female-Male dupont cables or Female-Female cables with header connectors (recommended)
- Set of Philips screwdrivers
- A Linux or macOS computer. It's completely possible to do it on Windows but I have no knowledge and no experience with that.
- Android platform-tools installed on the device
- A lot of patience
Preparations
Before we begin the actual operation, you need to get to the insides of your vacuum. This is not particularly easy. Start by removing the battery lid and the battery itself. Then, unscrew the front bumper. After that you can start unscrewing the main screws on the bottom. Don't forget about the small ones in between the water outlets too!
With all the screws gone, separate the two pieces of the vacuum's body. You need to use a small amount of force but also figure out a way to do it without breaking anything. It took me quite a while to get it done, but it's possible. Just keep trying.
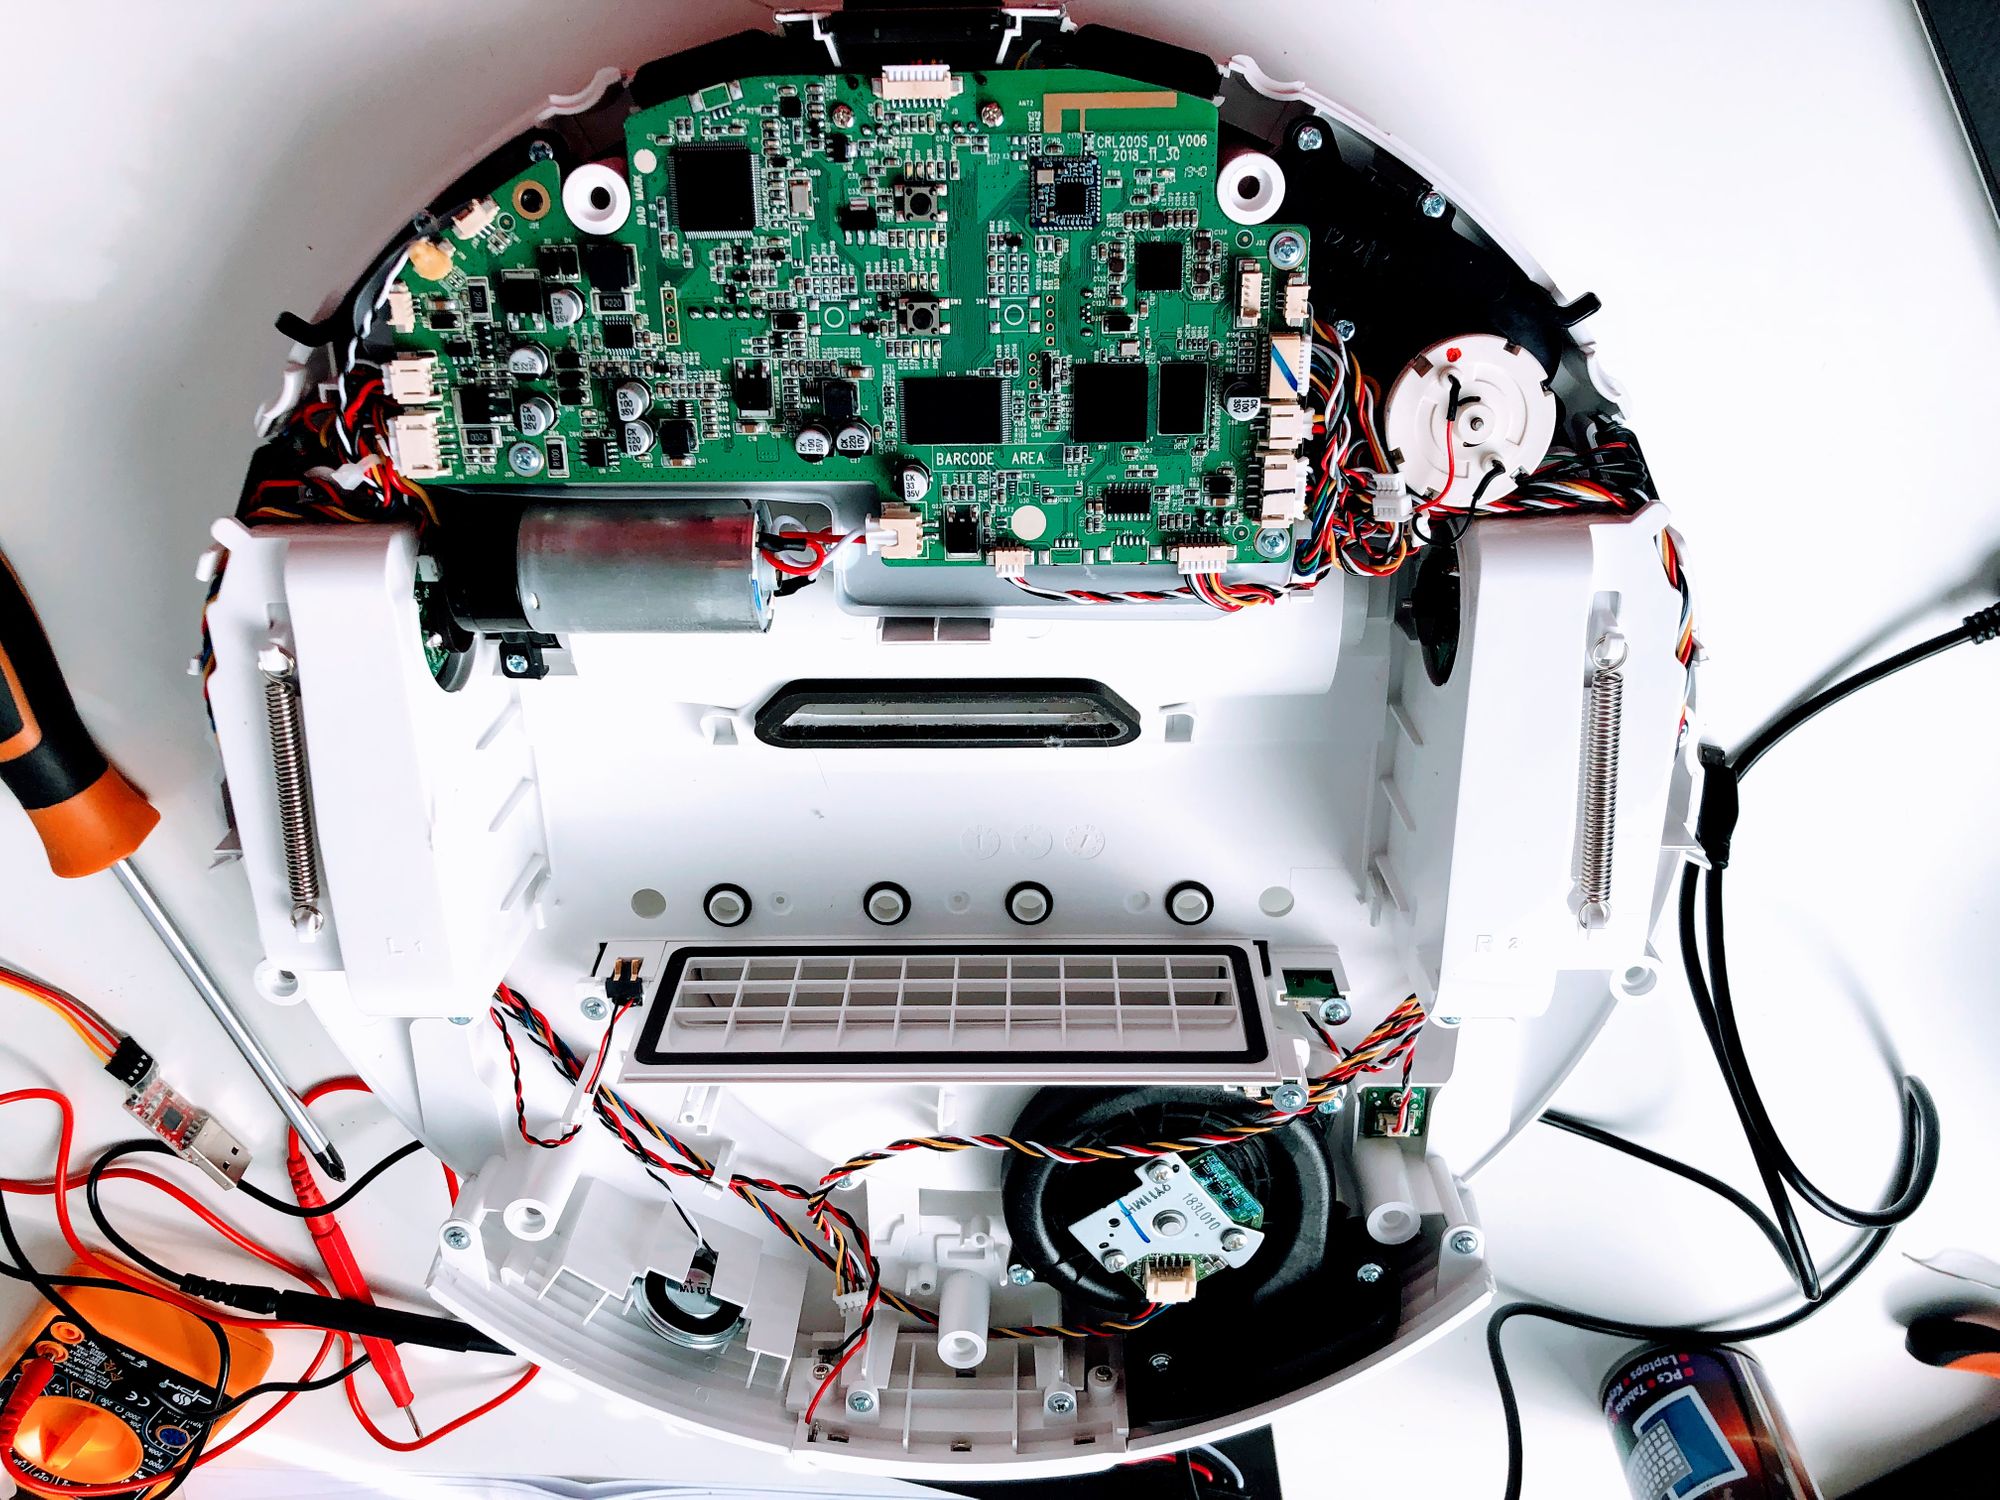
There's a single wire harness between the two pieces of the housing, connecting the motherboard to the Lidar sensor. Disconnect it and focus on the bottom part of the vacuum, the one with the motherboard. What you should be seeing is a motherboard, looking like the one on the picture on top of the article.
Now's the right time to connect your micro USB cable to the vacuum. Don't connect it to the computer yet, we'll do that later. Just connect the cable to the vacuum and leave it there for the rest of the process. Also, the battery should not be connected — we'll power the device through the USB port only.
And now it's time for the critical part. We need to connect our serial converter to the UART pins on the vacuum motherboard. These are the pins that we need to connect to:
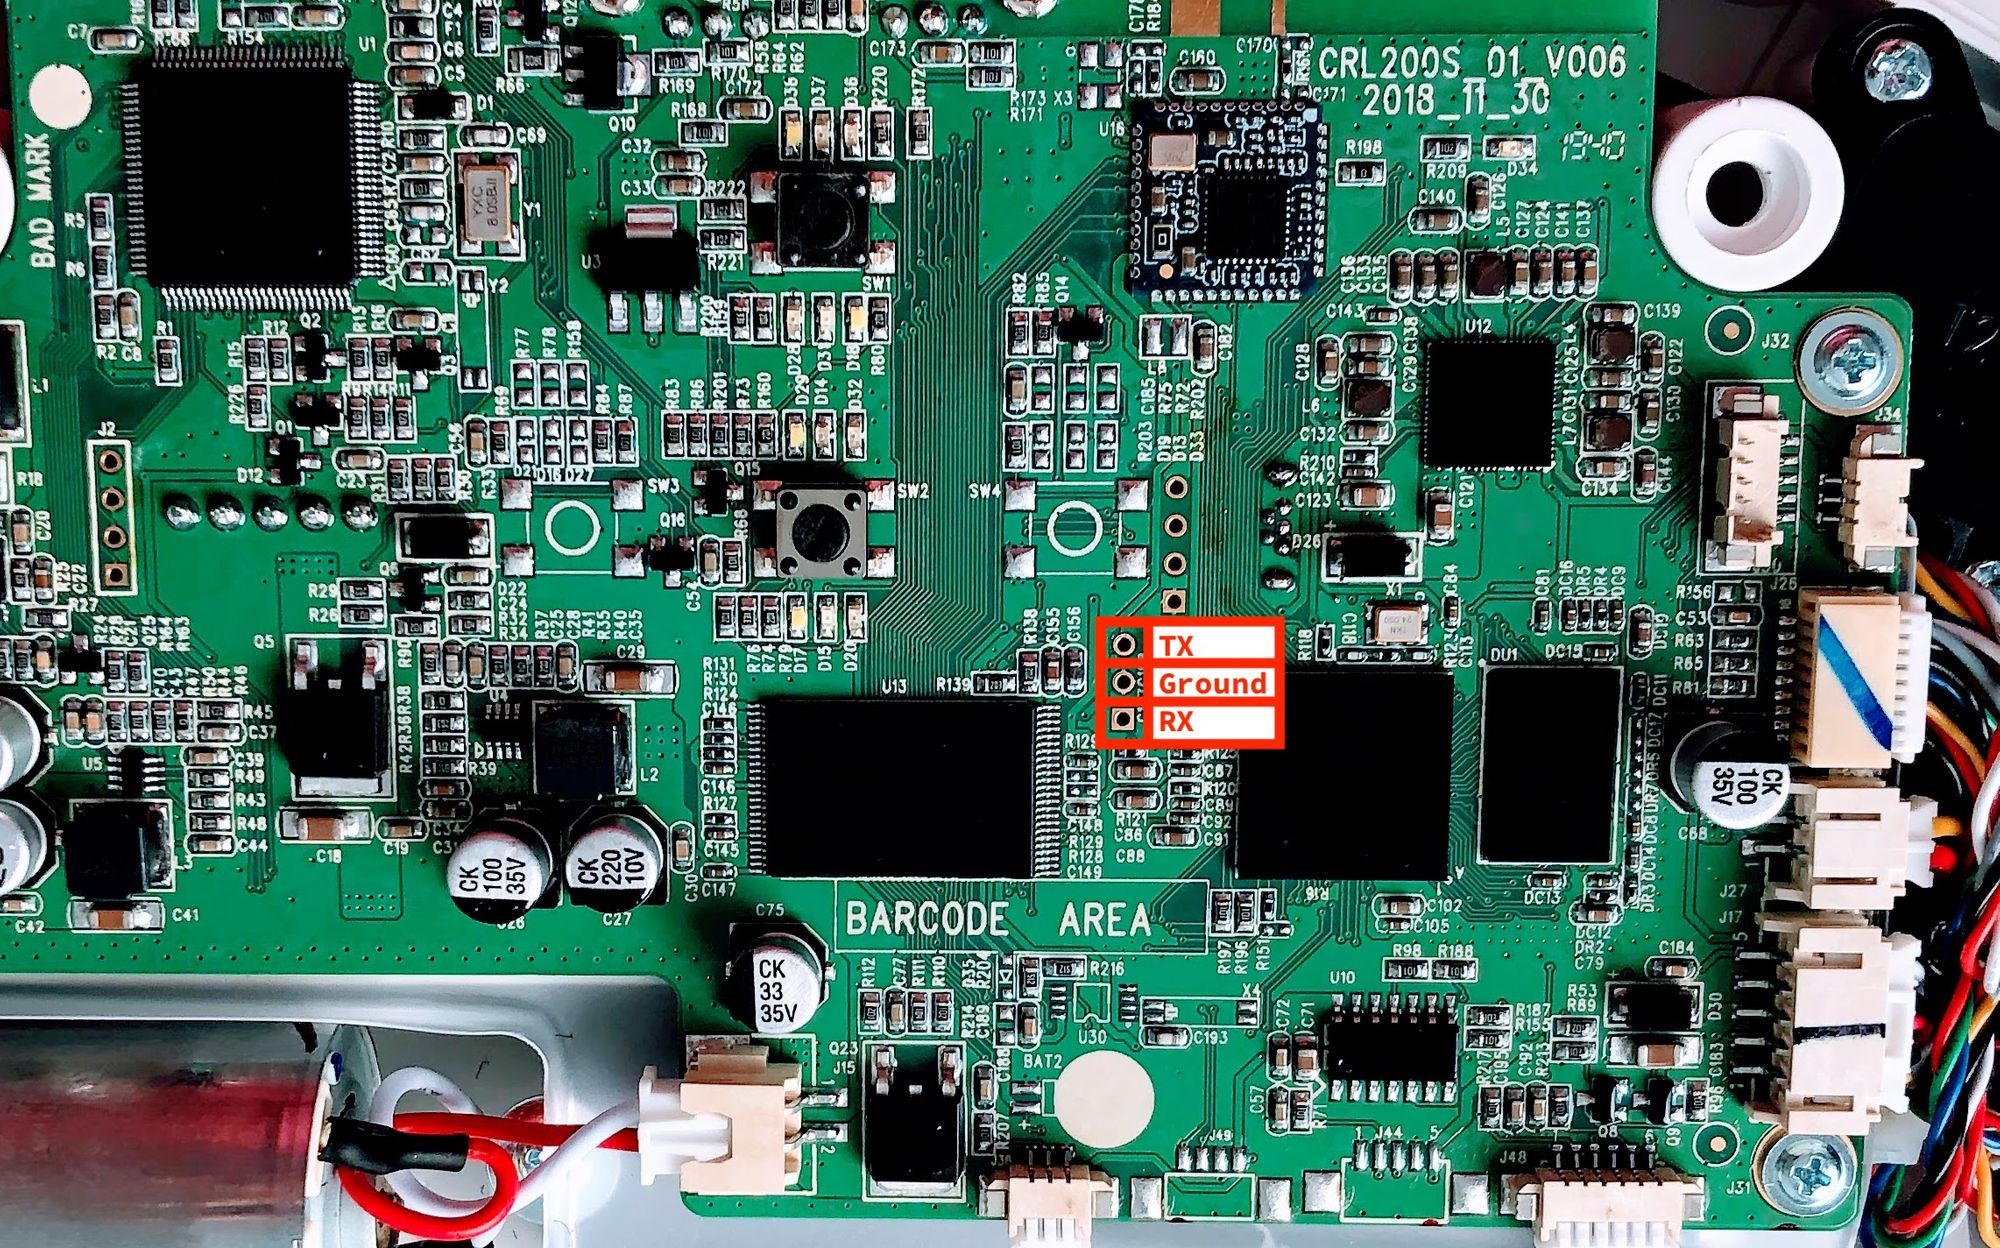
If you're using header pins, solder them now. If you're going with plain dupont cables, put the male connectors into those three holes, making sure they're touching the metal connectors on the board, and fix them in place using some non-conductive tape.
The last step before we begin is to download the newest firmware for your device. Head over to my previous guide and download the latest package to your computer. Once ready, unpack it (don't mind the .bin extension, it's just a gzip archive) and then unpack the target_sys.tar.gz file. There should two files inside - boot.img and rootfs.img. Have them prepared for the next steps, these two are the key to bringing life back into your vacuum.
What's the issue?
I still haven't explained what happens to broken vacuums that makes them not boot up anymore. Well, you're going to see that yourself in just a minute. The device actually tries to boot up. The unfinished update makes it boot to a recovery mode first, probably to finish the update process. The recovery, however, is broken. The moment it starts loading the kernel, the device reboots and the entire process starts over again, effectively placing the device in a bootloop.
What we're going to do to fix that is to manually flash the latest system image directly to the disk and then override the recovery image with our base boot image, so when the device launches again and tries to boot into recovery, a normal boot process is going to happen.
If you're wondering if that process breaks something on the device (for example standard updates, executed through the Mi Home app), then the answer is no. I've flashed the v3.5.3__0046 image using the method I'm describing in this guide and executed a successful, standard update to 0047 afterwards — without any issues.
The easy part
Let's finally begin. Take your USB serial converter and connect the dupont cables from the motherboard like that:
USB serial converter <-> Vacuum motherboard

3V3 <-> not connected
TX <-> RX
RX <-> TX
GND <-> GND
5V <-> not connected
With that, plug that converter into your computer and find out its name in your system (probably something like /dev/ttyUSB0). Then, let's start the screen session:
screen /dev/ttyUSB0 115200You should see be seeing a blank screen. Grab the USB cable connected to the vacuum and connect it to your computer too. If you connected everything properly, boot output should be streaming to your screen!
The ugly part
Now comes the part that I'm totally ashamed of. You might've noticed that UBoot doesn't react to anything you type on your keyboard – even when it says "press any key to stop auto boot". For some reason, it goes straight away to booting from disk and the only way to make it not do that is to, well, temporarily get rid of the disk.
The way I accomplished it was to grab something conductive (a flat screwdriver in my case) and place it on top of the flash chip pins so that it caused a short circuit and made UBoot launch its shell. I told you it was ugly. And while, yes, it worked for me a few times in a row, there was a huge chance that it would burn the chip. Keep that in mind while doing it yourself. It's an ugly, dangerous and overall awful solution, but it's the only one I was able to find. I could, of course, unsolder the chip completely and then solder it back with the device booted up to the UBoot command line, but it would take ages given how many times I had to go through the process.
If you manage to find a better way of doing it, please let me know and I'll remove this section completely so that no one else knows that I shared something this dirty.
If you are reading this, though, then you probably need to do that the way I did it. To make it a little easier for you, I marked the pins that you need to connect with a red line below:

Of course, you need to do that while the device is powered up and bootlooping, and hold until you see a command line prompt (a line ending with # and waiting for you to type commands). Also, don't connect all the pins. Even just two should be enough. The more you do, the higher the chances of frying the chip.
We're almost there
Now, if you have access to the bootloader command line, the most difficult part is behind you and you're just a few steps from having a vacuum again. Grab that shell and execute the following command:
fastboot_testThen, open up a second tab in your terminal app and execute (locally, on your computer):
fastboot devicesIf the command returns a connected device, you're ready for the final step!
Navigate to the directory where you unpacked the downloaded OTA package and execute the following commands:
fastboot flash boot boot.img
fastboot flash rootfs rootfs.img
fastboot flash recovery boot.img
Your output should like similar to this:
# > fastboot flash boot boot.img
Sending 'boot' (4096 KB)                           OKAY [  0.202s]
Writing 'boot'                                     OKAY [  0.626s]
Finished. Total time: 0.861s

# > fastboot flash rootfs rootfs.img
Sending 'rootfs' (23040 KB)                        OKAY [  1.001s]
Writing 'rootfs'                                   OKAY [  3.448s]
Finished. Total time: 4.483s

# > fastboot flash recovery boot.img
Sending 'recovery' (4096 KB)                       OKAY [  0.204s]
Writing 'recovery'                                 OKAY [  0.627s]
Finished. Total time: 0.863s
Now go back to the screen terminal tab, hit ctrl-c on your keyboard to exit the fastboot mode and type reset. Wait a few seconds and you should hear your vacuum speaking to you again. The only thing left now is to assemble it back together.
"Instructions unclear, got my junk caught in a ceiling fan"
Well, I warned you that I wasn't going to make it a guide for beginners. It's a difficult process and you should only do it if you at least suspect what you'd be doing. Despite its riskiness, the process can help you bring your vacuum back to life and given that you don't have much to lose, you can just go for it and try it.
If you need any help, the comments section below is there for you, so go ahead and ask away. I'll do my best to help.
Coming up with a way to fix my vacuum took way more time than it might seem when you look at the steps above. I spent many hours trying out different ways and combinations before I eventually came up with the one, which I believe was the easiest. If you like my work, used it to fix your vacuum, or just appreciate my efforts, you can go ahead and buy me a beer. I surely won't mind that :)