Fixing stuck Xiaomi STYJ02YM updates
If you're an owner of a Xiaomi-branded version of the Viomi V2 Pro — the beautifully called STYJ02YM, also known as the Mi Robot Vacuum Mop Pro in Europe — you might've encountered a common problem while trying to update the device. Quite often the progress bar jumps from 1% straight to 70, 80 or in some cases 90% and gets stuck there, until a few minutes later an error message appears. I, too, have been affected by this bug and after a few hours of debugging, I found a way to fix it.
Before we get into the instructions, keep in mind that although the process is fairly simple and I did my best to describe it as thoroughly as I could, you still need to have some technical knowledge if you want to follow it safely, at least to know when things are going south. I take no responsibility for any damage done to your device.
Alright, with that in mind, let's begin!
Prerequisites
- Xiaomi STYJ02YM - that's quite obvious
- Android platform-tools installed on your computer
- SSH client installed on your computer
- A Linux/Unix shell with some basic knowledge about it (Linux and macOS are fine natively, on Windows you're going to need to use either Cygwin or WSL)
- Micro USB cable
- Small Philips screwdriver
Rooting the device
To be able to access the device's file system, your device needs to be rooted. Rumpeltux has already done a great job by finding quite an easy way to root the STYJ02YM and describing it, but I'll put the instructions below anyway, adding some more details to make it easier for everyone to understand and follow.
Find the micro USB port
When you take out the main brush and its cover, you'll find out that there's a small plastic cover on top of it, held by four small screws. Unscrew them and take the lid off.
When you're done, you should be seeing a battery. Take that out too and disconnect it from the board. You're going to behold a micro USB port, sitting there and impatiently waiting for you to connect a cable into it. I've allowed myself to use a photo of that from Rumpeltux's guide below.
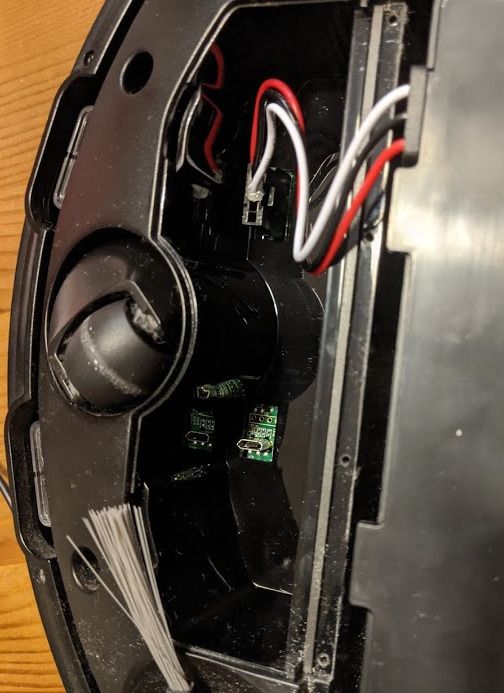
Connect the micro USB plug into the vacuum (with the battery still disconnected), but don't connect it to your computer just yet.
The device publishes an Android ADB server through the USB port, but it does so very briefly, for about 2 seconds on every boot. After that, the robot app disables the protocol. However, we can use that short 2-second window to execute our commands and enable SSH access to the system.
ADB Shell replacement
The vanilla adb_shell script that gets executed every time the adb shell command is run isn't particularly useful. In fact, it's completely useless. Here's how it looks like:
#!/bin/sh
export ENV='/etc/adb_profile'
if [ $1 = '-' ];then
	/bin/login
elif [ $1 = '-c' ];then
	/bin/login -c "$2"
else
	/bin/login
fiThere's no point in using the /bin/login binary over the ADB shell. Especially given the fact that it doesn't even accept such parameter as -c. So, let's modify it to actually fit our needs.
Create a file on your computer and call it adb_shell too. Paste the following script into it:
#!/bin/sh
export ENV='/etc/adb_profile'
exec /bin/sh "$@"Now, we need to upload the script onto the machine. Luckily, the adb push command allows us to modify the root file system, so we can do it with a single line of code. Unfortunately, given that ADB will be available very briefly, we need to place that command in a loop and connect the vacuum to our computer when the loop is running.
Fire up your terminal up, and execute the following commands (with the vacuum still disconnected):
chmod 755 adb_shell
while true; do adb push -a adb_shell /bin/adb_shell | grep -v "no devices"; done
With the command running, connect the device to your computer. You still don't need the battery - 5V from the USB port is enough to power the motherboard.
If you're lucky, you're going to see a message like this:
adb_shell: 1 file pushed, 0 skipped. 0.0 MB/s (100 bytes in 0.033s)If you do, you can ignore any messages that follow that one - even if they state some errors. If you, however, did not see a line like this a few seconds after connecting the vacuum (or didn't see any output), disconnect the vacuum, wait a few seconds, and try again. It can take quite a lot of tries to get it done. Just keep reconnecting the vacuum until it succeeds.
After the file's been copied, press ctrl+c to exit the loop and proceed with the next steps.
Now we're going to remove the symlink to the main robot app service, so that ADB does not get disabled on every boot. Execute the following command:
while true; do (adb shell rm /etc/rc.d/S90robotManager && echo "Done") 2>&1 | grep -v "no devices"; doneSame as before, when you see "Done", the command has succeeded. If it doesn't show up, unplug the vacuum, wait, and connect it again.
If the previous command has succeeded, the ADB should no longer be disabled on boot. To verify that, connect the vacuum and execute adb shell. If you see the output below and get a working shell, you're ready to proceed!
BusyBox v1.24.1 () built-in shell (ash)

_____  _              __     _
|_   _||_| ___  _ _   |  |   |_| ___  _ _  _ _
  | |   _ |   ||   |  |  |__ | ||   || | ||_'_|
  | |  | || | || _ |  |_____||_||_|_||___||_,_|
  |_|  |_||_|_||_|_|  Tina is Based on OpenWrt!
----------------------------------------------
Tina Linux (Neptune, 57513AA3)
----------------------------------------------
root@TinaLinux:~#Now it's time to install the Dropbear binary on the robot to enable SSH access. You can compile it yourself for the Sunxi architecture (guidelines on how to do that in the Rumpeltux's guide), but the easier way would be to use the precompiled binary - again, courtesy of Rumpeltux. You can download it from here.
Having downloaded the package, navigate to its directory in your terminal and execute the following commands (locally, not on the vacuum):
adb push dropbear_2015.71-2_sunxi.ipk /tmp
adb shell opkg install /tmp/dropbear_2015.71-2_sunxi.ipk
adb shell sed -i -e "/PasswordAuth/ s/off/on/g" /etc/config/dropbear
After that, disconnect and reconnect the vacuum. Let's try to access it using SSH. Execute the following command:
ssh root@192.168.13.37Obviously, replace 192.168.13.37 with the actual vacuum IP address. When the command asks you for password, paste in @3I#sc$RD%xm^2S&. Note, that you won't see any output when typing - you just have to believe it's there. Confirm with the return key and you should see the shell output again. If that's the case, execute the following command there:
passwdThe command will ask you for a new password, twice. Again, you won't see any movement as you type it. Enter a difficult password, so that your device is protected, but also make sure you're going to remember it. You can also add your public SSH key to the /etc/dropbear/authorized_keys file, but if you don't know what that is, you're free to stay with the password authentication.
Once that's done, we can re-enable the main robot app so that you actually get your vacuum back instead of having an expensive small computer on wheels. Execute the following command on the vacuum:
cd /etc/rc.d
ln -s ../init.d/robotManager S90robotManager
You can re-connect the battery now and put the four screws back in. Your vacuum is rooted and you have SSH access to its system. With just a little bit of luck, you won't have to use its micro USB port ever again.
Updating the vacuum
You've come a long way to you reach this section. Good news — your device is rooted! Bad news — you still haven't done anything in terms of updating it. So, let's change that.
First, you need to make sure that the vacuum is docked, charging, and connected to Wi-Fi. Next, you need to connect to it over SSH. To do so, simply execute the following command in your terminal, replacing the IP with the address of your vacuum:
ssh root@192.168.13.37After that, enter the password that you set in the previous steps and you should behold the welcome message from TinaLinux. All further commands will be executed in that shell, on the vacuum.
Grab your phone and fire up the Mi Home app. Open your vacuum page and tap the "three dots" icon in the top right corner. In the menu that shows up, scroll down and tap "Firmware updates".
If you see a progress bar, you need to wait until it fails updating. What you should be seeing is a screen with your current version number, new version number, and a button that lets you update the device. Do not press that button yet. Instead, switch back to your computer and execute the following:
cd /mnt/UDISK
cat config/PackageInfoConfig.ini
The command should return exactly the following:
[Upgarde_Config]
upgradeInstall=0
packageFlag=0
packageSize=0
remoteUrl=
packageMD5=
otaPackageVersion=
ramdiskSysMD5=
targetSysMD5=
If it does, grab your phone and hit the "Update" button. When the progress bar jumps from 1% to 70/80/90%, execute the last command again, and you should see an output similar to the one below:
[Upgarde_Config]
upgradeInstall=0
packageFlag=0
packageSize=0
remoteUrl=https://cdn.cnbj0.fds.api.mi-img.com/miio_fw/6b4f525a582876ddc13d376fee21d9e0_upd_viomi.vacuum.v7.bin?GalaxyAccessKeyId=5721718224520&Expires=159119
1344000&Signature=Y1OSsScYEarrCTx9ebhqb813emM=
packageMD5=6b4f525a582876ddc13d376fee21d9e0
otaPackageVersion=CRL200S-OTA
ramdiskSysMD5=
targetSysMD5=
Notice the "https" at the beginning of the update URL. The reason the update fails is that it can't finish the SSL handshake successfully, probably due to certificate mismatch or a bug in the SSL library installed on the vacuum. If you execute the command below, you'll see that the file it tries to download is empty, or completely missing:
root@TinaLinux:/mnt/UDISK# ls -l misc-upgrade/
-rw-r--r--    1 root     root             0 Mar 31 01:35 CRL200S-OTA.tar.gz
Luckily, the upgrade process retries the download a few times before it fails, and — even more luckily — it reads the config file every time it does so. The file from the URL below can be downloaded using plain HTTP protocol, so let's make the vacuum do so!
Open up the config file in a text editor:
vim config/PackageInfoConfig.iniAnd change the "https" at the beginning of the URL to "http". With that done, save the file (:wq in VIM) and… that's it. Watch the progress bar on your phone. After a minute or so it should go back to 1% and actually start the download process. You can actually monitor how the file grows by repeating the command:
ls -l misc-upgrade/Sharing is caring!
If you happen to be downloading an update that hasn't been known yet, make sure to copy the update URL from the file you were modifying and share it in the comments section below, along with the version number of the update you were downloading. For some, it might be more useful than you think!
Currently, we know the URLs of:
- v3.5.3__0046 (Vacuum V7)
- v3.5.3__0047 (Vacuum V7)
I'll update the list once we get more of those.
What's next
If you're lucky, the update is going to succeed, the vacuum is going to restart and work as great as it ever did. Your device should still be rooted after the update, so if the next one also gets stuck, you can go back to this guide and skip the rooting part.
You might not be lucky, though, just as many others haven't been — me included, unfortunately. Sometimes the device doesn't start up after an update. It just slowly flashes the buttons white, and that's pretty much all it's capable of doing. The bug occurs even to people who didn't use the workaround described in this guide to perform the update. You might be able to update the device without any issues straight from your phone and find out that your vacuum is now an expensive, blinking nightlight that can't even drive.
I've spent a lot of time on trying to fix my vacuum that got bricked after an update. And yes, I managed to find a way to do it. If you want to find out how, head over to this article.
If you have any questions about the guide, feel free to use the comments section below. If you like my work and used it to fix your vacuum, you can buy me a beer. One has to drink something in those tough times of home quarantine.